



I installed an Acumen M4 2ch Front/Rear dash cam mirror and hardwired using fuse taps. My car came with a Lexus integrated dash cam, but it was just so ugly and honestly not great to use, so I took it off. Also, I was installing a CTH Molle system so I knew the already limited rear view would be obstructed more by the shelf, so combining a front dash cam with a rear view mirror cam was a good solution. I’m writing up the main parts of the install so I remember down the road what I did, but hopefully it helps someone. I chose the Acumen over the Wolfbox G00 pro for a clean OEM look despite the G900 pro having better camera sensors. I just really didn’t like the visible plugs and wires on the wolfbox, and my main concern was just getting a digital rear mirror.

Install was pretty quick… took me less than 2 hours. The hardest part was getting the camera wire through the rubber conduit into the tailgate.
I purchased:
-Acumen M4 2 Ch kit
-M4 backplate
-#190 bracket
-Two low profile mini fuse taps (Advance Auto Parts - Down for Maintenance)
1. Remove the dome light console, the Lexus camera housing, the A-pillar cover, the fuse box cover (under the glovebox) and the dash side panel (next to the glovebox). Plenty of YouTube videos on how to do this.
2. Remove the OEM rear mirror assembly and wire/connector.
3. Screw the backplate and bracket to the Acumen mirror and then mount the mirror assembly to the windshield. Just a note here, the screws for the bracket are a hair too long for some reason, so I put some thin foam padding between the bracket and the backplate to separate them a little when screwing them together. Run the connectors and wire harness up the middle behind the headliner and into the space above the dome light console. All the connectors (power, rear cam, GPS, unused 3rd ch cam) should be in the space above the dome light to be connected to the wires as they are run in.

4. Starting with the GPS, mount the GPS module into the corner of the dash next to the speaker (double sided tape), push the wire behind the dash and then route it up along the A-pillar wire harness to the headliner, then inside the front edge of the headliner towards the dome light console. Snake the connector into the dome console area and plug it into the GPS connector.

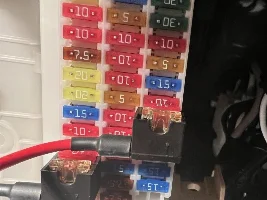
5. For the hardwire kit, you need to connect the 2 fuse taps to the ACC wire and the BATTERY wire of the hardwire harness (wires are labeled). I used solder seal connectors and a heat gun. Attach the black ground wire to one of the bolts on the side of the dash, then run the two fuse taps to the fuse panel. I used the DOME fuse for the constant power (BATTERY). Remove the 10a fuse for DOME and move it to the bottom slot of the fuse tap, place a new fuse in the top and place it in that slot (instructions say under 15a, I used a 7.5a). Fuse taps are directional, so wire should come out of the tap towards the middle of the car. For the ACC switched power fuse, there is an unused slot 3 slots down from the dome. Put a 7.5a fuse in the top slot of the tap and leave the bottom empty and put the tap into the unused slot. Zip tie the regulator module somewhere on the dash frame and run the power wire up the A-pillar along the harness with the GPS wire. Plug into the power connector. Zip tie both wires to the harness so they are tidy. These wires should be clear of and never cross over the airbag.


(Don’t mind the crooked fuse, I corrected that)

6. Rear camera: The rear camera wire needs to be run BEHIND the airbag in the A-pillar. Starting at the top of the door frame, pull off the weather stripping and push the camera connector behind the airbag towards the windshield, and run it up along the front headliner to the dome light space and connect it to the rear cam (#1) connector. Then going back to the door frame, start running the rest of the wire inside the headliner (detach weatherstripping) and in the gaps between the pillar trim and headliner to the back of the car. The hardest part of the install was getting the connector through the rubber conduit (that is already stuffed with the existing wiring harness) to the lift gate. Remove the plastic trim above the rear window, pop off both ends of the conduit and slowly push the connector through. Once it pops out the other end, pull it through and connect it to the camera. Replace the trim and mount the camera. There is a large excess of wire that can be zip tied together and stored in the D pillar. There is a cover for the 3rd row seatbelt (Overtrail trims) that can be popped off and the wire can be dropped in there.


Start the car and check that everything is working properly before putting all covers and trim pieces back. There wasn't a lot of information out there showing which fuses to tap in the GX550 or LC250, so I thought this might be helpful . I'm not 100% sure if the empty fuse slot I'm using for ACC is completely switched because the startmycar.com diagram (2024 Lexus GX 550 fuse box diagram - StartMyCar) shows it as an ECU controlled fuse. If I find my camera is doing weird stuff when the car is off, I will try a different slot (rear wiper?) but so far its been recording in sentry when I'm parked without an issue. I'm loving this upgrade, although getting my eyes adjusted to using a digital rear cam has been an interesting experience LOL. Hope this helps.
Install was pretty quick… took me less than 2 hours. The hardest part was getting the camera wire through the rubber conduit into the tailgate.
I purchased:
-Acumen M4 2 Ch kit
-M4 backplate
-#190 bracket
-Two low profile mini fuse taps (Advance Auto Parts - Down for Maintenance)
1. Remove the dome light console, the Lexus camera housing, the A-pillar cover, the fuse box cover (under the glovebox) and the dash side panel (next to the glovebox). Plenty of YouTube videos on how to do this.
2. Remove the OEM rear mirror assembly and wire/connector.
3. Screw the backplate and bracket to the Acumen mirror and then mount the mirror assembly to the windshield. Just a note here, the screws for the bracket are a hair too long for some reason, so I put some thin foam padding between the bracket and the backplate to separate them a little when screwing them together. Run the connectors and wire harness up the middle behind the headliner and into the space above the dome light console. All the connectors (power, rear cam, GPS, unused 3rd ch cam) should be in the space above the dome light to be connected to the wires as they are run in.
4. Starting with the GPS, mount the GPS module into the corner of the dash next to the speaker (double sided tape), push the wire behind the dash and then route it up along the A-pillar wire harness to the headliner, then inside the front edge of the headliner towards the dome light console. Snake the connector into the dome console area and plug it into the GPS connector.
5. For the hardwire kit, you need to connect the 2 fuse taps to the ACC wire and the BATTERY wire of the hardwire harness (wires are labeled). I used solder seal connectors and a heat gun. Attach the black ground wire to one of the bolts on the side of the dash, then run the two fuse taps to the fuse panel. I used the DOME fuse for the constant power (BATTERY). Remove the 10a fuse for DOME and move it to the bottom slot of the fuse tap, place a new fuse in the top and place it in that slot (instructions say under 15a, I used a 7.5a). Fuse taps are directional, so wire should come out of the tap towards the middle of the car. For the ACC switched power fuse, there is an unused slot 3 slots down from the dome. Put a 7.5a fuse in the top slot of the tap and leave the bottom empty and put the tap into the unused slot. Zip tie the regulator module somewhere on the dash frame and run the power wire up the A-pillar along the harness with the GPS wire. Plug into the power connector. Zip tie both wires to the harness so they are tidy. These wires should be clear of and never cross over the airbag.
(Don’t mind the crooked fuse, I corrected that)
6. Rear camera: The rear camera wire needs to be run BEHIND the airbag in the A-pillar. Starting at the top of the door frame, pull off the weather stripping and push the camera connector behind the airbag towards the windshield, and run it up along the front headliner to the dome light space and connect it to the rear cam (#1) connector. Then going back to the door frame, start running the rest of the wire inside the headliner (detach weatherstripping) and in the gaps between the pillar trim and headliner to the back of the car. The hardest part of the install was getting the connector through the rubber conduit (that is already stuffed with the existing wiring harness) to the lift gate. Remove the plastic trim above the rear window, pop off both ends of the conduit and slowly push the connector through. Once it pops out the other end, pull it through and connect it to the camera. Replace the trim and mount the camera. There is a large excess of wire that can be zip tied together and stored in the D pillar. There is a cover for the 3rd row seatbelt (Overtrail trims) that can be popped off and the wire can be dropped in there.
Start the car and check that everything is working properly before putting all covers and trim pieces back. There wasn't a lot of information out there showing which fuses to tap in the GX550 or LC250, so I thought this might be helpful . I'm not 100% sure if the empty fuse slot I'm using for ACC is completely switched because the startmycar.com diagram (2024 Lexus GX 550 fuse box diagram - StartMyCar) shows it as an ECU controlled fuse. If I find my camera is doing weird stuff when the car is off, I will try a different slot (rear wiper?) but so far its been recording in sentry when I'm parked without an issue. I'm loving this upgrade, although getting my eyes adjusted to using a digital rear cam has been an interesting experience LOL. Hope this helps.
Last edited: