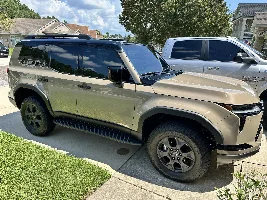
🛠️ Member Build Munkeeboi's Nori GX (1 Viewer)

�Member Build
Truck really looks great. Any reason you chose the MT64 over the BP51? Did you need the brake line extensions?
2nd part of your question, yes, 88 rotors installed both the brake line and sway bar extensions. I'm not sure if it's because i went the full 3 up front and 2" in the rear or if it's because I don't have the KDSS system. I just let them do their thing as they install these all day
 
Nice work on your build, it's looking great! Did you notice any additional exhaust drone within the cabin after installing this exhaust?
Thanks. There is absolutely no drone while cruising or coasting. You really only hear when you are on the throttle and even then, it is just a more a post-pubescent version of the stock sound :ROFLMAO:. More of a growl than a whimper
 
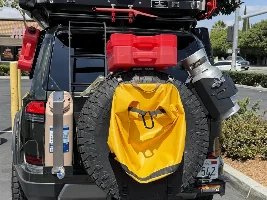
Added more beef.

Method MR 703 17” +35 with Toyo AT3 285/75/17. No rubbing and no trimming

Rims bought again from Trucks R Us when there was a coinciding Method sale

10% additional off using my referral code - LXZ-JS3J4QN (code works for their full site of truck parts)

Before
View attachment 18795

After
View attachment 18796
niiceee buuildd
what aboouut theee vosseeeen??
Sorrrry my keeybooard iiis crrrazy
 
Well...you sound like a good candidate for these. Mud/water will still get there, but it will stop 95% of everything that is getting flung up from your wheels. I got them because I didn't like having that huge gap when putting my kid in the car seat. It prevents that extra temptation to lean in a little closer and get your pants all dirty.

Easy to install or lots of drilling?
 
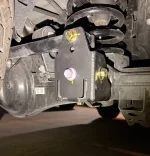
I just installed the Dr KDSS B.O.T.C.K. (using the stock trackbar) after reading some recent posts, and it definitely fixed the rear end, jittery slop I was experiencing after my MT64 lift. I had always thought the bumpy and jumpy rear-end was tire-related (C-rated Toyos, alignment, tire, or improper inflation). Plus, I previously had the Westcott spacers (with un-corrected trackbar), so the feeling of the stock ride was long gone in my memory

I got the standard kit as I had a 3.5” difference between each side. This thing is beefy in every way. The trackbar was previoulsy slanted down and connected where the lower bolt is in my photo.

@IntrinoX/BBO gave me the best deal for them (as they hardly go on sale), and they arrived the next day since I’m in CA. The install took about 30 min on my driveway.

Watch the YouTube install video, and it’s as easy as the video. Because of the lift, there is no need to drop the spare or remove any tires to get this done. Ramps would give you extra clearance but can be done flat on the ground.

 

Attachments

  • IMG_8885.webp
    IMG_8885.webp
    128.6 KB · Views: 127
Last edited:
I just installed the Dr KDSS BOTCK (using stock bar) after reading some recent posts, and it definitely fixed the rear end, jittery slop I was experiencing after my MT64 lift. I had always thought the bumpy and jumpy rear-end was tire-related (C-rated Toyos, alignment, tire, or improper inflation). Plus, I previously had the Westcott spacers (with un-corrected trackbar), so the feeling of the stock ride was long gone in my memory

I got the standard kit as I had a 3.5” difference between each side

@IntrinoX/BBO gave me the best deal for them (as they hardly go on sale), and they arrived the next day since I’m in CA. The install took about 30 min on my driveway.

Watch the YouTube install video, and it’s as easy as the video. No need to drop the spare or remove any tires.
Sure does wonders for such a small piece!
 
I just installed the Dr KDSS B.O.T.C.K. (using the stock trackbar) after reading some recent posts, and it definitely fixed the rear end, jittery slop I was experiencing after my MT64 lift. I had always thought the bumpy and jumpy rear-end was tire-related (C-rated Toyos, alignment, tire, or improper inflation). Plus, I previously had the Westcott spacers (with un-corrected trackbar), so the feeling of the stock ride was long gone in my memory

I got the standard kit as I had a 3.5” difference between each side. This thing is beefy in every way. The trackbar was previoulsy slanted down and connected where the lower bolt is in my photo.

@IntrinoX/BBO gave me the best deal for them (as they hardly go on sale), and they arrived the next day since I’m in CA. The install took about 30 min on my driveway.

Watch the YouTube install video, and it’s as easy as the video. Because of the lift, there is no need to drop the spare or remove any tires to get this done. Ramps would give you extra clearance but can be done flat on the ground.

I wonder if this would help with the ride also for a stock GX
 
Likely not, since the trackbar was designed to be level on stock suspension. It's when you add a lift (or presumably if you lower it) that changes the angle and how the bar functions.

It's in its name...this is more of a corrective part than an enhancement.
 
Last edited:
Likely not, since the trackbar was designed to be level on stock suspension. It's when you add a lift (or presumably if you lower it) that changes the angle and how the bar functions.

It's in its name...this is more of a correction part than an enhancement.
I wonder how it works for the 2025+ factory 1” lift
 
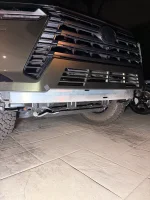
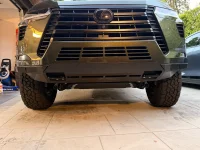
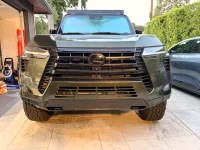
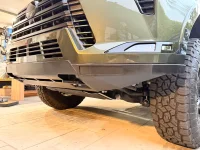
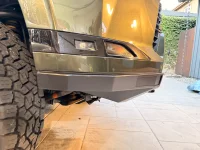
I was the fortunate member who inherited @nonamex 's old NYTOP Front bumper. I finally had the time to refinish it and install it. Despite knowing ahead of time that the fitment was not 100%, I think I made enough adjustments during install that I am happy with the final results. The hardest part was removing the lower valance without taking off the entire bumper. Almost beat me, but it's possible with the right tools.
 

Attachments

  • IMG_8902.webp
    IMG_8902.webp
    173.6 KB · Views: 678
  • IMG_8910.webp
    IMG_8910.webp
    271.5 KB · Views: 90
  • IMG_8918.webp
    IMG_8918.webp
    267.6 KB · Views: 82
  • IMG_8916.webp
    IMG_8916.webp
    222.2 KB · Views: 86
  • IMG_8913.webp
    IMG_8913.webp
    182 KB · Views: 91
I was the fortunate member who inherited @nonamex 's old NYTOP Front bumper. I finally had the time to refinish it and install it. Despite knowing ahead of time that the fitment was not 100%, I think I made enough adjustments during install that I am happy with the final results. The hardest part was removing the lower valance without taking off the entire bumper. Almost beat me, but it's possible with the right tools.
Looks great, well done!
 
I was the fortunate member who inherited @nonamex 's old NYTOP Front bumper. I finally had the time to refinish it and install it. Despite knowing ahead of time that the fitment was not 100%, I think I made enough adjustments during install that I am happy with the final results. The hardest part was removing the lower valance without taking off the entire bumper. Almost beat me, but it's possible with the right tools.
Looks really good ... fitment looks spot on .... what tools would make it possible thought taking the front bumper off?
 
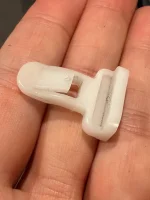
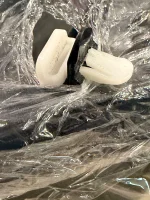
There are 12 lower valance retainer clips that have varying difficulty to remove based on the location and access. You have to push down the center locking tab to be able to slide the retainer off.

I used a variety of curved picks, stubby /long screwdrivers and a flathead bit inside my work gloves to be able to get enough downward pressure on the release tab. My fingertips are still numb from trying to use just my fingertips to remove the clips.

The NYTOP Instructions show the location and orientation off the clips. Some clips are horizontal and the ones toward the middle are vertical


Attachments

  • IMG_8920.webp
    IMG_8920.webp
    58.2 KB · Views: 69
  • IMG_8921.webp
    IMG_8921.webp
    219.5 KB · Views: 70
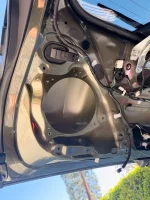
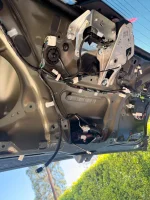
I was never happy with hollowness of the trunk hatch. But with the Beatsonic amp, I was getting better sound but more rattling from the rear.

It was time to add some deadening! I decided to start on the rear hatch before moving forward with the rest of the cabin since most of the rattling I was hearing was sub driven.

Disassembly is mostly all pressure clips and I watched a couple YouTube’s to figure most of it out. Start from the top of the glass and work your way down.

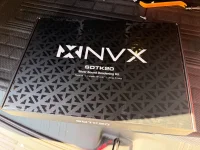
I only used one full 18” x 32” NVX sheet of sound deadening material. Getting behind the sub is easy with the large opening. It’s not so easy to get to the driver side, but I was able to get pretty good coverage through the available openings. It helps to have a sharp razor, a good roller and a cloth (sewing) measuring tape

I was working outside in 95 degree weather and forgot to take pictures of the after before I started reassembling. Just imagine silver deadening material along the outer skin and smaller pieces on the flatter portions of the inner skin. I just tapped around and added material where it sounded hollow.

Here’s the before and after


Attachments

  • IMG_9132.webp
    IMG_9132.webp
    153.1 KB · Views: 49
  • IMG_9133.webp
    IMG_9133.webp
    159.6 KB · Views: 50
  • IMG_9135.webp
    IMG_9135.webp
    276.7 KB · Views: 55
After the first “thump down”, there are no longer any discernible rattles on the interior, and I feel that the sub is more noticeable. Could be a placebo effect but it sure sounds good.

On the exterior of the trunk hatch, there are still a ton of rattles coming from my license plate and along the whole rear tail light bar. Something I will live with for now since I accomplished what I wanted to on the inside.

I’m going to work on the doors and cargo area in the next couple weeks and will mostly follow this thread on the LC forum.


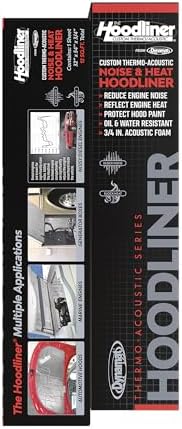
Or for more hardcore sound deadening

 
Last edited:
Great link, thank you. When the weather in AZ gets back to sane temps I'm going to work on this.
 

Similar threads

Users who are viewing this thread

GX550 Poll

  • Yes, I can pick up in Los Angeles (Burbank area)

    Votes: 7 41.2%
  • Yes, but I need it shipped.

    Votes: 10 58.8%
Back
Top Bottom