🛠️ Member Build Overtrail Upgrades (3 Viewers)

�Member Build
Finished the bump stop install today, will have a full report soon. Thumbs up for the Perry Parts bump stops. A bit too expensive in my opinion but I think I’m worth it. I’m not sure I needed the 1” spacer in the rear bump stop though.
 
The rear stop is massive with the spacer, like comically huge, I think it will limit up-travel too much. I’m off roading and camping tomorrow so we’ll see what it does.

IMG_4962.webp
 
Here are photos of the bump stop replacement.

I went with Perry Parts MK3 bump stops:

Perry Parts MK3 Front Bump Stops: Lexus GX 550

Perry Parts MK3 Rear Bump Stops: Lexus GX 550

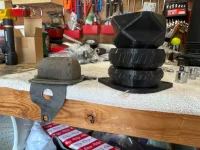
The stock front bump stop surprised me - I had never really looked closely at it. It's more of a bump pimple.
1.webp


I first tried to remove the entire mounting bracket but the springs are in the way and I couldn't remove 1 of the 2 bolts holding the bracket.
2.webp


Then I realized that you could just twist out the bump stop by grabbing the squared-off base plate with a pipe wrench (it was too big for even my large adjustable wrench). My driver's side bump stop had some really torn up rubber and the pipe wrench didn't help it's condition at all. I didn't get any clear pics of this part. Once you get an initial half turn to loosen it, you can use a channel lock and then just your hand to remove it.
3.webp


The stock bump stops compared to the new Perry Parts MK3 shows how small the stock bumps are.....especially the rears.
4.webp
5.webp


Then you just screw in the base portion and tighten the front bolt 1 full turn, then screw on the actual bump stop portion and hand-tighten. They also provide a few small packs of grease to put on the threads.
6.webp
7.webp


The rears are much easier to remove and replace. The rear Perry base requires 3 full turns of the bolt to properly seat the rear.
8.webp
9.webp
10.webp
11.webp


I emailed Perry Parts and told them I had about 3 to 3.5 inches of lift on the rear and they recommended I include a 1-inch spacer section.
12.webp
13.webp


The new bump stop is a giant compared to stock and I was concerned it would be too big and possibly limit up-travel.
14.webp
15.webp

16.webp


I did a little off-roading this weekend and the bump certainly touched the axle but it doesn't look like it was really pressed on very hard, looks like it just touched (you can see the imprint where it rubbed off some mud). I didn't exactly go all Joe Cool super-flex-photo-shoot but I had some high-speed fire road with some good woops and bumps and some 4-low crawling over rocks too. I'll have to do some Joe Cool flexing when I have a chance and see how much it squashes in there.
17.webp
18.webp
 
Looks great man! You're running basically the set up I'm planning on doing on mine.

You running off the shelf rear shocks #25001-416A ? Any extended lower rod ends on the shocks for those Dobinson's? You've got the compression/up travel taken care of from a bumpstop perspective - just want to caution you over extending the shock at full droop with the springs unloaded as the OTS kit is "safe" up to around 1.5" lift.
 
Yes, I have 25001-416A rear King shocks. I'll look into the over-extension issue. Westcott wasn't concerned.
 
I realized a while ago that my winch wasn't working. Been meaning to correct this as there is no reason to drag around an expensive and heavy winch up front if it doesn't freakin' work.

I traced all the electric lines and it was connected fine and the winch was receiving power. I reached out to Overland Vehicle Systems (OVS) where I purchased this 12k SCAR winch and they sent me a troubleshooting guide. Fun fact: SCAR stands for Submersible Compact Amphibious Recovery. I was very slightly less than enamored with the idea of going through the tedious and maddening task of tearing off the front end and likely removing the front bumper again. I pushed them to just send me a replacement winch so I could dedicate a day to swapping it out and I'd send them back the original. They said "um we don't think so" and then one of the reps told me it is probably the little on/off switch on the winch - I pushed back and he said "trust me, it's the switch." Seems to be a common problem. They sent me 2 new switches and I finally got around to changing it out.

I was adamantly against tearing off the front of the truck so I tried to go down through the top end (removed that giant flat black plastic cover immediately behind the grill) and no dice. I was able to remove the switch with one arm down from the top behind the grill and the other hand holding the wires through the front of the grill with a long needle nose pliers. I thought awesome this will be easy but one of the wires was severed and it came apart as I disconnected it from one of the terminals/tabs on the switch. I was very impressed that this 12,000-lb-rated heavy duty waterproof winch is apparently frequently incapacitated by switch wires where the engineers chose a gauge roughly equal to newborn baby hair.

So, of courses I tore off the front of the truck and fixed it. Works like a champ now. It better keep working like a champ or this thing will get an overall D for dogshit rating from me.

I also found that most of my electrical connections were still waterproof but the plastic connecters have suffered. Plastic is already brittle and cracking apart. I couldn't disconnect a harness on the driver's side because it was jammed with sand. I tore apart the outer plastic shell trying to get it apart with vice grips.

My passenger side fog light has been flickering and the passenger side turn light next to the fog left the chat months ago. I checked it all and found that the Hyuga turn bulb (actually same as thier fog bulb) was probably just burnt out. I was also missing a 10mm bolt from a plastic housing piece that covers the fog and turn bulbs and connects it to the main front piece. Must have rattled out. The Hyuga bulbs were therefore loose and constantly shaking and vibrating in their housings. The area behind the main front plastic face-lift mask on these trucks is an absolutely non-sensical maze of plastic pieces on top of plastic pieces held together by hope, love, depression, and various screws, 10mm bolts, and the the discarded G-strings of over-50 strippers.

Got a replacment pair of Hyuga bulbs on the way. Went with Amber this time because it reminds me of a stripper I once knew.

IMG_5210.webp


IMG_5209.webp

Top tab is unused and absent from the newer replacement switches.

IMG_5211.webp

Switch removed - the top frayed wire and middle wire are connected together with a jumper tab and they connect to the bottom tab on the switch. Top wire broke off from the tab on middle wire.

IMG_5212.webp

I wired the two wires together with one of those solder-in-middle butt connector that you heat up and it makes a good soldered connection. I followed up with a long shrink-wrap over the whole thing (not pictured)

IMG_5213.webp

New baby-hair-wire switch installed. Better keep working.
 
Last edited:
Classic Gilligan's Island scenario. 3-hour tour turns into something else entirely! Replace Ginger with Amber and there you go...
 
I realized a while ago that my winch wasn't working. Been meaning to correct this as there is no reason to drag around an expensive and heavy winch up front if it doesn't freakin' work.

I traced all the electric lines and it was connected fine and the winch was receiving power. I reached out to Overland Vehicle Systems (OVS) where I purchased this 12k SCAR winch and they sent me a troubleshooting guide. Fun fact: SCAR stands for Submersible Compact Amphibious Recovery. I was very slightly less than enamored with the idea of going through the tedious and maddening task of tearing off the front end and likely removing the front bumper again. I pushed them to just send me a replacement winch so I could dedicate a day to swapping it out and I'd send them back the original. They said "um we don't think so" and then one of the reps told me it is probably the little on/off switch on the winch - I pushed back and he said "trust me, it's the switch." Seems to be a common problem. They sent me 2 new switches and I finally got around to changing it out.

I was adamantly against tearing off the front of the truck so I tried to go down through the top end (removed that giant flat black plastic cover immediately behind the grill) and no dice. I was able to remove the switch with one arm down from the top behind the grill and the other hand holding the wires through the front of the grill with a long needle nose pliers. I thought awesome this will be easy but one of the wires was severed and it came apart as I disconnected it from one of the terminals/tabs on the switch. I was very impressed that this 12,000-lb-rated heavy duty waterproof winch is apparently frequently incapacitated by switch wires where the engineers chose a gauge roughly equal to newborn baby hair.

So, of courses I tore off the front of the truck and fixed it. Works like a champ now. It better keep working like a champ or this thing will get an overall D for dogshit rating from me.

I also found that most of my electrical connections were still waterproof but the plastic connecters have suffered. Plastic is already brittle and cracking apart. I couldn't disconnect a harness on the driver's side because it was jammed with sand. I tore apart the outer plastic shell trying to get it apart with vice grips.

My passenger side fog light has been flickering and the passenger side turn light next to the fog left the chat months ago. I checked it all and found that the Hyuga turn bulb (actually same as thier fog bulb) was probably just burnt out. I was also missing a 10mm bolt from a plastic housing piece that covers the fog and turn bulbs and connects it to the main front piece. Must have rattled out. The Hyuga bulbs were therefore loose and constantly shaking and vibrating in their housings. The area behind the main front plastic face-lift mask on these trucks is an absolutely non-sensical maze of plastic pieces on top of plastic pieces held together by hope, love, depression, and various screws, 10mm bolts, and the the discarded G-strings of over-50 strippers.

Got a replacment pair of Hyuga bulbs on the way. Went with Amber this time because it reminds me of a stripper I once knew.

View attachment 25603

View attachment 25604
Top tab is unused and absent from the newer replacement switches.

View attachment 25605
Switch removed - the top frayed wire and middle wire are connected together with a jumper tab and they connect to the bottom tab on the switch. Top wire broke off from the tab on middle wire.

View attachment 25606
I wired the two wires together with one of those solder-in-middle butt connector that you heat up and it makes a good soldered connection. I followed up with a long shrink-wrap over the whole thing (not pictured)

View attachment 25607
New baby-hair-wire switch installed. Better keep working.

Don't really like OVS product, just cheap crap they rebrand as theirs.
I wonder what made you choose them vs Warn, Superwinch or others?
 
Funny you ask....I've been browsing Superwinch's website again....

Although I am definitely not impressed with this OVS winch switch issue, I went this route because all winches are full of cheap china crap or equivalent these days. "Assembled in USA from globally sourced parts" is just a nice way to say it. I was shopping awnings from OVS while I was working on the bumper project and the price was right on the Scar so I grabbed it. It reportedly has the proper water and dust ratings.

I've had a Ramsey worm gear winch, a Superwinch, and a Terrafirma winch. Ramsey makes an awesome winch but I don't think it's really worth the $2500 entry fee - it's really overkill for my needs. Same with Warn, I just don't think their "assembled in USA" Zeon line is worth about $2k for their 12k winches. I never thought Warn was as good as Warn thinks they are....except for the M8274. I helped a buddy rebuild his dad's old 8274 and that thing was a beast. Good luck getting one mounted on a modern truck, though.

I have a winch up front as insurance, not because I enjoy spending all day on winch-fest trails. The Superwinch was my favorite and I should have gone with another Superwinch for my GX. I had planned on using my working-again OVS yesterday just to see how it was out in the real world but it was cold and raining too much to voluntarily test it. I hit a few giant mud puddles hoping to force the issue but didn't get stuck. I'll be camping again in a week or two in a place where I will very likely get stuck so we'll see how it does.

What I'll probably end up doing is getting a Superwinch SX or Tiger Shark and mounting the solenoid box up under the hood.

IMG_5275.webp
 
Back in April I installed these front seat lift blocks from Amazon. I couldn't get the front seat bottom cushion canted back enough to be comfortable on long drives. This kit from Amazon came with two 1" thick blocks and two 1/2" thick blocks. I installed the 1" blocks under my driver's seat. Just yesterday I finally got around to installing the 1/2" blocks under my passenger seat.

Anxingo Driver or Passenger Front Seat Lift Kit Recline Spacer,1/2"-1.5" Recline Kit Lift $24.42

I did have to buy different bolts at the local hardware store because the bolts that came with the kit had too much blank shoulder and they wouldn't screw all the way down tight. When I installed the passenger side I also bought new bolts, just 1/2" shorter (about 13mm shorter) than the drive's side. They are metric grade 10 bolts, don't remember the size off-hand, just brought the kit's bolts with me to size them.

ALSO, very important, the seat rail bottoms have locator pegs just behind the bolt holes, so you have to drill holes through the plastic seat block to accept the pegs. I just loosely installed the block with a bolt through it to keep it in place and then rubbed the peg back & forth on the block so it made an indentation on the plastic seat block, then drilled through the indent. I didn't get a picture of this but it looks something like this (red circle is drilled out hole):
1793572850174.webp


I loosened the rear seat frame bolts about 10 turns so I could freely lift up the front end. Then tighten the rears back down after you tighten the fronts.
IMG_5331.webp


IMG_5333.webp


The stock Lexus seat bolts are the shortie black bolts, the next bolt is the short kit bolt, next is the long kit bolt, last 60mm bolt next to the tape measure is the hardware store bolt:
IMG_5332.webp
 
I installed a set of $89.99 Husky Liners Outside Mount Low Profile Ventvisors:

https://huskyliners.com/p/husky-liners-low-profile-ventvisor/

I've always been on the fence when it comes to these things that I usually just call rain guards. I've never had a set and I'm not very fond of the looks but I've always thought that they'd be good to have so I can leave my windows open an inch or so to vent the Arizona heat without just leaving the windows open an inch for everyone to see (and sun to get in too). They are also perfect for camping and sleeping in the truck, providing fresh air and privacy but keeping out rain, morning sun, etc. So on they went.

On this truck they look fine - you can't even really tell they're there. They look a little odd from the inside looking out but they'll probably take a while to get used to.
1.webp


2.webp


3.webp


I'm not impressed with the quality of these things from Husky. I have their front & rear floor liners and those are excellent, they are 100% perfect. These rain guards are cut pretty roughly and the edges are uneven, sharp, and have a very obvious and inconsistent white-ish rough cut edge finish. I wet sanded the edges with 2000-grit sandpaper and I was able to even them out a bit and eliminate the razor-sharp edge (I sliced the pad on my middle finger installing one and literally dripped blood down the door) but the white edge is still apparent and unsightly even after wet-sanding and cleaning.

You can see the uneven cuts and the white edge below:
6edge.webp


I'm also very disappointed in the consistency of the shape and fit. The 2 driver's side pieces line up fairly well where the 2 doors meet but the passenger side is way off. Three of the 4 pieces were "pretty good" but the front passenger guard is crap. I'm going to write them and try to get a replacement. The leading edge of the front passenger guard looks like it was cut out on a Friday afternoon 5 minutes before the whistle blew on the floor and it had a sharp, triangular hook on the end. I used a file to shave it down and it worked so well that I wish I had filed all edges of all 4 pieces before I got started (I had already installed the other 3 pieces). The top back end of the front passenger guard is also fubared and it doesn't line up with the rear piece. The front guard is also about 1/8" short. Maybe it's user error - I lined up the front edge first and then realized I should have started at the rear. But once your remove that tape, you're committed. No one would probably notice except for me, but I'm #1 in my world.
4.webp


5.webp


Another gripe is the appearance of the leading edge on both front door guards. They just gave it a lame little rounded edge that matches nothing and looks weird from the driver's seat. It should dive all the way down flush. Unfortunately I couldn't find a good way to trim it to make it look better; it needs more material not less.
7.webp


Wind noise is fine driving with the windows cracked. To get some real airflow, you have to roll the windows down an inch below the new edge. I like driving with the windows open and inch or so, especially both passenger side windows so you get good fresh air flow but not a lot of noise.

Finally, I was a bit surprised by how close the plastic guard is to the actual glass window. I expected the gap to be a good 1/2" or 3/4" but it's only 5/16" or 8mm. So the air flow isn't great with the window cracked but still above the level of the guard.
IMG_5457.webp
 
I installed a set of $89.99 Husky Liners Outside Mount Low Profile Ventvisors:

https://huskyliners.com/p/husky-liners-low-profile-ventvisor/

I've always been on the fence when it comes to these things that I usually just call rain guards. I've never had a set and I'm not very fond of the looks but I've always thought that they'd be good to have so I can leave my windows open an inch or so to vent the Arizona heat without just leaving the windows open an inch for everyone to see (and sun to get in too). They are also perfect for camping and sleeping in the truck, providing fresh air and privacy but keeping out rain, morning sun, etc. So on they went.

On this truck they look fine - you can't even really tell they're there. They look a little odd from the inside looking out but they'll probably take a while to get used to.
View attachment 26329

View attachment 26330

View attachment 26331

I'm not impressed with the quality of these things from Husky. I have their front & rear floor liners and those are excellent, they are 100% perfect. These rain guards are cut pretty roughly and the edges are uneven, sharp, and have a very obvious and inconsistent white-ish rough cut edge finish. I wet sanded the edges with 2000-grit sandpaper and I was able to even them out a bit and eliminate the razor-sharp edge (I sliced the pad on my middle finger installing one and literally dripped blood down the door) but the white edge is still apparent and unsightly even after wet-sanding and cleaning.

You can see the uneven cuts and the white edge below:
View attachment 26332

I'm also very disappointed in the consistency of the shape and fit. The 2 driver's side pieces line up fairly well where the 2 doors meet but the passenger side is way off. Three of the 4 pieces were "pretty good" but the front passenger guard is crap. I'm going to write them and try to get a replacement. The leading edge of the front passenger guard looks like it was cut out on a Friday afternoon 5 minutes before the whistle blew on the floor and it had a sharp, triangular hook on the end. I used a file to shave it down and it worked so well that I wish I had filed all edges of all 4 pieces before I got started (I had already installed the other 3 pieces). The top back end of the front passenger guard is also fubared and it doesn't line up with the rear piece. The front guard is also about 1/8" short. Maybe it's user error - I lined up the front edge first and then realized I should have started at the rear. But once your remove that tape, you're committed. No one would probably notice except for me, but I'm #1 in my world.
View attachment 26333

View attachment 26334

Another gripe is the appearance of the leading edge on both front door guards. They just gave it a lame little rounded edge that matches nothing and looks weird from the driver's seat. It should dive all the way down flush. Unfortunately I couldn't find a good way to trim it to make it look better; it needs more material not less.
View attachment 26335

Wind noise is fine driving with the windows cracked. To get some real airflow, you have to roll the windows down an inch below the new edge. I like driving with the windows open and inch or so, especially both passenger side windows so you get good fresh air flow but not a lot of noise.

Finally, I was a bit surprised by how close the plastic guard is to the actual glass window. I expected the gap to be a good 1/2" or 3/4" but it's only 5/16" or 8mm. So the air flow isn't great with the window cracked but still above the level of the guard.
View attachment 26338
I can tell you that the factory oem LC250 fit perfect…. I’m disappointed husky couldn’t figure out the visors
 

Users who are viewing this thread

GX550 Poll

  • Yes, I can pick up in Los Angeles (Burbank area)

    Votes: 7 41.2%
  • Yes, but I need it shipped.

    Votes: 10 58.8%
Back
Top Bottom