Installed the aFe Power Vulcan Series 2-1/2 IN to 3 IN 304 Stainless Steel Axle-Back Exhaust System.
See this link also:
Vulcan Series 2-1/2 IN to 3 IN 304 Stainless Steel Axle-Back Exhaust System
It's a quality item. It came to $330 shipped with a 10% coupon for signing up for emails on their website.
View attachment 18894
View attachment 18895
Installation was pretty simple. Getting to the bolts underneath is a bit difficult but the hardest part was getting the spring bolts/pins loose from the stock exhaust. aFe provides bolts and washers to anchor the stock pins to the aFe flange but they instruct you to re-use the actual springs, bolts securing the springs, and the pins.
My photos from underneath the truck of the spring bolts and disassembly and reassembly didn't turn out. Normally I'd crawl back under to re-take the photos to provide the best possible reader experience but I just dropped my truck off at Westcott Designs to have the King suspension installed. I beg your forgiveness. Here's a parts diagram showing where the spring bolts are in the system:
View attachment 18900
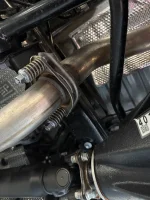
Once I removed the stock exhaust, I had to break the pins free from the stock flange by securing the stock exhaust in a vice and then screwing the spring bolts back down tight (without the springs) and over-torquing them a bit to break the pins free. I applied a little PB Blaster first. Then I had to grab the pin with a vice grip to get the bolt back off, then the pins spun free by hand. The stock square bolts on the backside of the flange that the pins screw into are welded in place.
View attachment 18896
View attachment 18897
The spring bolt holes on the aFe flange are bigger that the stock holes and the pins were loose in there so I used their washers on the bottom and a couple new washers on top under the nut they provided.
View attachment 18898
I slipped the clamp on the tailpiece, fit everything together loosely, got the rubber hangers in place (a little dab of bearing grease helps), and then torqued down the spring bolts and then the clamp bolt.
View attachment 18899
The exhaust tucks up much better than stock and no more looking at that ugly black resonator box under there. It sounds good, not too much louder than stock. It has a nice little snarl to it and, most importantly, no drone at cruising speeds. You can't even hear it on the highway. My wife didn't notice a thing, even standing outside of the garage waiting for me to back out when I started the truck. Then again, she didn't notice a new steel bumper and winch on an old Land Rover for nearly a year and she didn't notice the Westcott pre-load collar lift and new Method wheels and 35" tires on the GX until my son spilled the beans a few weeks after installation.
I've put links to short youtube video/sound clips on the other thread:
Vulcan Series 2-1/2 IN to 3 IN 304 Stainless Steel Axle-Back Exhaust System