🛠️ Member Build Groovy Incognito OT+

�Member Build
Link/instructions for how you did this?
The lights were mounted on the top rung of the grill. I then ran each lights wire (shown with red lines drawn) and followed them down and behind the grill where the all met at the bottom. Used small zip ties to secure the wires. I ran all wires to the driver side of the vehicle behind the headlights where I tapped into one of aux switches. The aux switch connector is located where the circle with an X through it is. The links above will show what I bought and the YouTube link on how to wire the aux switch. As an alternative, you can route the wires to the opposite side (passenger) and tap into an ignition fuse. I preferred it on an aux switch so I can turn them off.
IMG_7649.jpeg
 
Last edited:
Thank you. The hitch step I got is made by Weather Tech.
Thanks! I like this setup. I was looking at the Carr folding one but at ~$300 - seems a bit steep...
I like that yours sits so close to the bumper! Is that the 12 or 24" step?
Also are you using a locking pin if so which one?
And did you need a anti-rattle adapter?
 
Thanks! I like this setup. I was looking at the Carr folding one but at ~$300 - seems a bit steep...
I like that yours sits so close to the bumper! Is that the 12 or 24" step?
Also are you using a locking pin if so which one?
And did you need a anti-rattle adapter?
I haven’t put on a locking pin yet. Keep in mind that the Weather Tech step is made of a very hard plastic. Not much rattle sounds. It works for my purpose.
 
I haven’t put on a locking pin yet. Keep in mind that the Weather Tech step is made of a very hard plastic. Not much rattle sounds. It works for my purpose.
Oh the entire thing is plastic? Interesting, most are steel with a plastic molded cover...
 
Just ordered and installed a phone mount by Offroam. This is solid and I love the location vs the 3D printed phone mount that goes where the cigarette lighter plug is.
IMG_7760.webp
IMG_7761.webp
 
Does it block any of the screen when the phone is attached? Did you buy their arm attachment or is that a different one?
I just ordered their charging version so it came with all that including the arm. Very adjustable so you can place in various positions. The position I have it in does not block the screen.
 
The lights were mounted on the top rung of the grill. I then ran each lights wire (shown with red lines drawn) and followed them down and behind the grill where the all met at the bottom. Used small zip ties to secure the wires. I ran all wires to the driver side of the vehicle behind the headlights where I tapped into one of aux switches. The aux switch connector is located where the circle with an X through it is. The links above will show what I bought and the YouTube link on how to wire the aux switch. As an alternative, you can route the wires to the opposite side (passenger) and tap into an ignition fuse. I preferred it on an aux switch so I can turn them off.
View attachment 20388

Just getting back to looking into this and have a few questions now that I mostly understand what needs to be done.

For the wiring, did you zip tie the wires going down from each light to the vertical grill bars? Were you able to completely hide the wires?

Any tips/lessons worth sharing?
 
Last edited:
Yes all tge routes light to one point in their supplied wire harness. They all join to one wire that goes to the aux switch. I went with switch 2 since I wanted to save Aux 1 (30 amp) for something that requires more power. Zip ties are not noticeable unless you’re looking for them. Zip tie to your preference of being hidden. That was the most time consuming part.
 
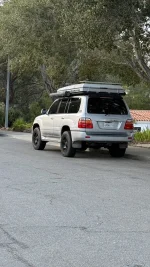
Lifted the truck with Westcott Pre Load Collar lift and installed Relations Race Wheels RRW RR7 V Flow wheels wrapped with 35 x 12.5 x 17 Nitto Ridge Grappler Tires. I wanted to do something a little different and go with the Rays Wheels in bronze but trying to find the right size and in stock was a challenge. I'll ride these wheels until I find something.
Roof rack installed. I’ve added the Baja Designs OnX6 40” Arc Series dual control light bar, 4 Baja Designs S2 work/scene lights for perimeter lighting, 2 S2’s as Chase lights. I’ve also also added Agency 6 grab handles. Very pleased as how sturdy this roof rack by Rago Fabrications is.
View attachment 19305
Nice build. How much trimming needed to run the 35s. Or did the wheel offset take care of it?
 
I had a custom drawer system built by Overlander Woodworks that includes two drawers to store my camp kitchen, recovery tools, etc. I have a fridge slide w built in 120v plugs into my Ecoflow battery. The battery is charged via Ecoflows alternator charger so a quick drive will keep the battery topped off at 100%. The height of the drawer system is at the same height of the rear seats when folded so an extended wood platform completes the sleeping platform that is level.
View attachment 18424View attachment 18425View attachment 18426View attachment 18427View attachment 18428View attachment 18429
Love this drawer system- but it appears that you have had to sacrifice use of your built in inflator. Or was this originally a NON-Overtrail vehicle?

A wooden drawer system must be heavy ?

Also with the additional weight from your cool mods are you seeing a drop in mileage?

My old cruiser has a very heavy Alucab and custom rack. The mileage suffered immensely. Are you experiencing the same? We elected to keep our GX fairly light on its feet to maintain its mileage from going from poor to worse.

Again super impressive build.
 

Attachments

  • IMG_0851.webp
    IMG_0851.webp
    265 KB · Views: 22
  • IMG_0971.webp
    IMG_0971.webp
    265.9 KB · Views: 29
Love this drawer system- but it appears that you have had to sacrifice use of your built in inflator. Or was this originally a NON-Overtrail vehicle?

A wooden drawer system must be heavy ?

Also with the additional weight from your cool mods are you seeing a drop in mileage?

My old cruiser has a very heavy Alucab and custom rack. The mileage suffered immensely. Are you experiencing the same? We elected to keep our GX fairly light on its feet to maintain its mileage from going from poor to worse.

Again super impressive build.
Yeah it has some weight but not too bad. I can still use my tire inflator. There is a flip up panel on the side that I can access the inflator. I can just see it enough to read the display and plenty of room to connect and disconnect the air hose. I didn’t see that much of a mileage hit with the drawers but did with the bigger tires.
 
Had to remove a bracket on the rear portion of the front fender. I forgot what that brackets purpose was. Also, a little trimming on the front portion of the front fender but it’s not even noticeable.
 
Yes all tge routes light to one point in their supplied wire harness. They all join to one wire that goes to the aux switch. I went with switch 2 since I wanted to save Aux 1 (30 amp) for something that requires more power. Zip ties are not noticeable unless you’re looking for them. Zip tie to your preference of being hidden. That was the most time consuming part.

Nice, thanks. I ended up doing this yesterday before seeing your reply. But overall easy, my only issue is the wire to the connector for each light it pretty short so it made hiding those bumps a little difficult.

Overall it’s pretty hidden, if you look super close a portion of 1 wire is noticeable but not unless you’re looking into the grill. Same goes for zip ties.

We’ll see how long they hold up, still work after washing the GX today. Results below.
 

Attachments

  • IMG_3577.webp
    IMG_3577.webp
    119.4 KB · Views: 22

Users who are viewing this thread

GX550 Poll

  • Yes

    Votes: 4 12.9%
  • No, not planning on it

    Votes: 20 64.5%
  • Not yet , but definitely planning on it

    Votes: 7 22.6%
Back
Top Bottom