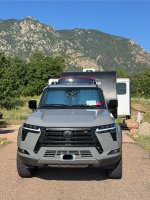
This is awesome! Thanks so much! I just got my white 2025 GX OT yesterday so can’t wait to get started!!!Thanks for the link, nonamex! I checked my spreadsheet and I don't have the black front emblem entered.
I originally bought a matte/matte emblem but I it was too dark for my tastes. So I emailed them and ordered a matte/gloss. They sent it to me for free so I gave my original matte/matte to TexasD90.
Here is a close-up of mine - it is a matte background with the gloss logo.
View attachment 15110
Navigation
Install the app
How to install the app on iOS
Follow along with the video below to see how to install our site as a web app on your home screen.
Note: This feature may not be available in some browsers.
More options
You are using an out of date browser. It may not display this or other websites correctly.
You should upgrade or use an alternative browser.
You should upgrade or use an alternative browser.
🛠️ Member Build Overtrail Upgrades (2 Viewers)
- Thread starter Bluegill
- Start date
�Member Build
Looks awesome! Thanks!Did the same choice as Bill, it’s worked out well…, really like this look.
Bill, here is another reference pic of the WeatherTech windshield sun shade for you.
Hi Teghogh,a question on your spare setup. are you sure you can use the ET lugs that are on your methods on the spare as well?
or you are carrying OEM lugnuts for the spare. thanks
If the question is for me, short answer:
Yes, I’m carrying 1 set of OEM lugnuts and a torque wrench to put the OT OE spare wheel on if ever needed.
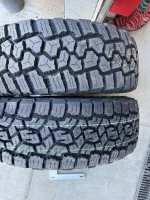
The E rated spare tire is same diameter as the main 4; it just barely fits all the way up.
Pic shows unmounted spare on left, a main on right.
Attachments
- Thread starter
- #426
My Bangbed arrived today and I quickly set it up in the cargo area. Much simpler than the Helebox. So much simpler. So so so so so much simpler.
It's a bit tight setting it up with the rear seats up, but my boys had the rear seats reclined back pretty far. I clicked them forward a bit and then the rear bed fit fine. It actually is kind of nice with this set up in there. It's not too high to still be able to load something heavy and bulky like a full cooler and it gives some nice storage underneath. I may cruise around with it installed as well and see how I like it.

As far as taking it down and stowing it for camping (if I need more vertical load space), the two leg boards fit nearly perfectly in the little dip area behind the 2nd row seats in the Overtrails. Then the 2 big boards just lay on top. The presence of the Bangbed wood would be even more unnoticeable if you remove the rubber cargo mat....or put the mat on top of the wood pieces.


The backs of the 2nd row seats still angle up just a bit but they do compress when you lay on them and it should be unnoticeable with a camp mattress & blankets on there. Our main bed is one of those adjustable things and we actually sleep with the head side up a couple inches so it's not an issue at all for me.

One thing that I do notice vs. the Helebox platform is the sleeping surface length. The Helebox platform was a full 70 inches because it went over the folded 2nd row seats. Now with this Bangbed platform and just the folded 2nd row seats, I've lost a bit of length. With my thick (4") camping mattress and pillow and a couple bags behind the front seats it won't be an issue. I'm 5'10" but if you're over 6 feet tall you might miss a bit of solid platform under you. The solution is to put camping gear (bags or whatever) behind the front seats to support the camp mattress under your head and adjust the front seat all the way forward. On another note, you also lose a lot of vertical room with the Helebox platform because the frame goes up & over the folded 2nd row seats.

Overall, I'm very happy with it. It is heavy as it's solid wood. I might use a big coring bit to drill out some material, but I also don't want to sacrifice rigidity. I think I'll dye/stain it black too, should look good with much darker but still showing the grain. The seal coat over the top. Or maybe just put black speaker box carpet on it. I'll keep you posted.
It's a bit tight setting it up with the rear seats up, but my boys had the rear seats reclined back pretty far. I clicked them forward a bit and then the rear bed fit fine. It actually is kind of nice with this set up in there. It's not too high to still be able to load something heavy and bulky like a full cooler and it gives some nice storage underneath. I may cruise around with it installed as well and see how I like it.
As far as taking it down and stowing it for camping (if I need more vertical load space), the two leg boards fit nearly perfectly in the little dip area behind the 2nd row seats in the Overtrails. Then the 2 big boards just lay on top. The presence of the Bangbed wood would be even more unnoticeable if you remove the rubber cargo mat....or put the mat on top of the wood pieces.
The backs of the 2nd row seats still angle up just a bit but they do compress when you lay on them and it should be unnoticeable with a camp mattress & blankets on there. Our main bed is one of those adjustable things and we actually sleep with the head side up a couple inches so it's not an issue at all for me.
One thing that I do notice vs. the Helebox platform is the sleeping surface length. The Helebox platform was a full 70 inches because it went over the folded 2nd row seats. Now with this Bangbed platform and just the folded 2nd row seats, I've lost a bit of length. With my thick (4") camping mattress and pillow and a couple bags behind the front seats it won't be an issue. I'm 5'10" but if you're over 6 feet tall you might miss a bit of solid platform under you. The solution is to put camping gear (bags or whatever) behind the front seats to support the camp mattress under your head and adjust the front seat all the way forward. On another note, you also lose a lot of vertical room with the Helebox platform because the frame goes up & over the folded 2nd row seats.
Overall, I'm very happy with it. It is heavy as it's solid wood. I might use a big coring bit to drill out some material, but I also don't want to sacrifice rigidity. I think I'll dye/stain it black too, should look good with much darker but still showing the grain. The seal coat over the top. Or maybe just put black speaker box carpet on it. I'll keep you posted.
I may have to treat myself to an early birthday present.
- Thread starter
- #428
I made a bottom piece for my Victory 4x4 rear cargo area shelf. The Victory shelf is advertised with lots of small holes in the bottom shelf piece but the product they are shipping now has fewer, larger holes in the shelf. Depending on what you put up on you your shelf, stuff either pokes through and gets in your line of sight, or stuff just plain falls through.
I ordered a 24"x48"x 1/8" ABS Plastic Sheet from Amazon for $30. The actual inner shelf size is about 41 X 16, more like 40-7/8 X 15-7/8.
Amazon.com: 24"x48"x 1/8" ABS Plastic Sheet Textured Front Smooth Back Vacuum Forming THERMOFORMING : Industrial & Scientific
I cut the plastic sheet down to 40-1/2" X 15-3/4". I covered the smooth side with leftover self-adhesive subwoofer fabric and I set the plastic sheet into the shelf with the textured side down and the fabric side up so that the stuff up there doesn't rattle around or slide around.
No more stuff poking through or falling through the big holes.


The light is another Amazon pickup. $35 and it has a double magnetic base and it rotates so the light can be mounted wherever you want it and it can shine up or down. I put it back on the driver's side and you can't see it in the rear view mirror. It puts out a ton of light. It has high & medium (low) and low is plenty of light. It has a large USB rechargeable 6000mAh battery and it should last about 10 hours on low. It can obviously be taken out and mounted on the roof or rack or wherever you have a steel surface. It also has a red flasher if you hold the on/off button for a few seconds but it would much be better if it had a solid red light.
Ropelux Work Light 3rd Gen, 3200LM Ultra Bright Mechanic Under Hood Lights with 6000mAh, Rechargeable Portable Magnetic Trouble Lighting Bar with Hooks for Car Repair, Inspection, Emergency, Tool Gift - Amazon.com


I ordered a 24"x48"x 1/8" ABS Plastic Sheet from Amazon for $30. The actual inner shelf size is about 41 X 16, more like 40-7/8 X 15-7/8.
Amazon.com: 24"x48"x 1/8" ABS Plastic Sheet Textured Front Smooth Back Vacuum Forming THERMOFORMING : Industrial & Scientific
I cut the plastic sheet down to 40-1/2" X 15-3/4". I covered the smooth side with leftover self-adhesive subwoofer fabric and I set the plastic sheet into the shelf with the textured side down and the fabric side up so that the stuff up there doesn't rattle around or slide around.
No more stuff poking through or falling through the big holes.
The light is another Amazon pickup. $35 and it has a double magnetic base and it rotates so the light can be mounted wherever you want it and it can shine up or down. I put it back on the driver's side and you can't see it in the rear view mirror. It puts out a ton of light. It has high & medium (low) and low is plenty of light. It has a large USB rechargeable 6000mAh battery and it should last about 10 hours on low. It can obviously be taken out and mounted on the roof or rack or wherever you have a steel surface. It also has a red flasher if you hold the on/off button for a few seconds but it would much be better if it had a solid red light.
Ropelux Work Light 3rd Gen, 3200LM Ultra Bright Mechanic Under Hood Lights with 6000mAh, Rechargeable Portable Magnetic Trouble Lighting Bar with Hooks for Car Repair, Inspection, Emergency, Tool Gift - Amazon.com
- Thread starter
- #429
Used the Bambed on a quick overnight camp trip this week. Worked fine. I set it up in the cargo area before the trip and it is very nice to have that extra storage underneath....BUT, one major flaw is that I could only open the cooler a few inches before the cooler lid hit the overhead shelf with the cooler up on the platform. There's a downside to everything! Very inconvenient for loading the cooler, getting stuff out, etc. As far as sleeping, comfort, etc. it was perfect. I painted the edges black and put carpet tiles on top and it worked out well. Unfortunately one of the 2 platform pieces has warped and now it doesn't sit flat, it kind of wobbles back & forth from side to side.


Was very convenient for making coffee in the morning.

Was very convenient for making coffee in the morning.
- Thread starter
- #431
Here ya go:@Bluegill might of missed it, but do you have a link to the matte screen protector?
2024+ Lexus GX 550 | 14" Main Infotainment | Matte/Anti-Glare | Screen
You are the man
I've had these for several months myself and love these things! Love that they also keep leaves from getting trapped in those channels.FYI - I bought these windshield seals a few weeks ago and was blown away how much wind noise improvement it provided during our 20 hour road trip. I didn't' even adhere the stickers, just stuck them in the slots and they work PERFECT. I ordered a backup set, just in case. That's how much I love them.
Amazon.com: Front Glass Sealing Tape for 2024 2025 Lexus GX550 GX550H soundproofing Noise Reduction Exterior Gap Strips Grille Blocking Foreign Objects Upgrades Decoration Tuning Supplies Accessories : Automotive
Buy Front Glass Sealing Tape for 2024 2025 Lexus GX550 GX550H soundproofing Noise Reduction Exterior Gap Strips Grille Blocking Foreign Objects Upgrades Decoration Tuning Supplies Accessories: Weather Stripping - Amazon.com ✓ FREE DELIVERY possible on eligible purchaseswww.amazon.com
Interesting, I've tucked wires from roof rack down that channel to engine compartment and covered with clear ppf tape (mountain bike chain slap tape). That looks like a clean alternative!I've had these for several months myself and love these things! Love that they also keep leaves from getting trapped in those channels.
- Thread starter
- #435
Somehow I missed this post about this front glass sealing tape. I just ordered it....for $15 I figured I'd give it a try. I checked out my truck and I never realized that there was such a big gap there under the black trim at the edge of the windshield.I've had these for several months myself and love these things! Love that they also keep leaves from getting trapped in those channels.
Absolutely great deal, they are on sale now (think I paid $20).Somehow I missed this post about this front glass sealing tape. I just ordered it....for $15 I figured I'd give it a try. I checked out my truck and I never realized that there was such a big gap there under the black trim at the edge of the windshield.
Important note when installing. Make sure you first use common sense and align them first on how they should sit.
First cleaned and dried the channel. I believe they were incorrectly labeled (RH vs LH).
Tucked the lower part behind the wiper cowl and into the channel and aligned the top to curve along the top of the windshield frame.
Then slightly pulled off the tape from the top corner while applying pressure on the trim so that it remains perfectly inline with the windshield side trim..
Repeat on the other side.
Good luck!
(I believe someone in the Amazon ratings posted a photo where they were happy but I noticed that it was incorrectly installed lol)
Roman,Absolutely great deal, they are on sale now (think I paid $20).
Important note when installing. Make sure you first use common sense and align them first on how they should sit.
First cleaned and dried the channel. I believe they were incorrectly labeled (RH vs LH).
Tucked the lower part behind the wiper cowl and into the channel and aligned the top to curve along the top of the windshield frame.
Then slightly pulled off the tape from the top corner while applying pressure on the trim so that it remains perfectly inline with the windshield side trim..
Repeat on the other side.
Good luck!
(I believe someone in the Amazon ratings posted a photo where they were happy but I noticed that it was incorrectly installed lol)
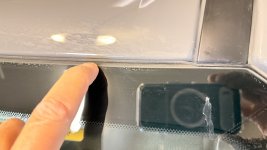
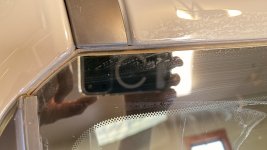
Have you found, or looked into a similar strip for going along the top edge of the windshield?
It is a smaller gap..but I’d like to try it.
It seems a small “T” shaped piece with thin, very flush wings might work, even if I had to shorten the leg portion that actually inserts into the small gap.
Thanks for any help, opinions.
DJ
You mean the bug & dirt trap at the top of the windshield?Roman,
Have you found, or looked into a similar strip for going along the top edge of the windshield?
It is a smaller gap..but I’d like to try it.
It seems a small “T” shaped piece with thin, very flush wings might work, even if I had to shorten the leg portion that actually inserts into the small gap.
Thanks for any help, opinions.
DJ
No…at the top. There is a thin OEM rubber strip in there; but my ‘24 OT still collects dust and pollen pretty badly. I mean, it looks unfinished to me.You mean the bug & dirt trap at the top of the windshield?
Edit: Yes. At the top!
Attachments
Last edited:
- Thread starter
- #440
Thanks for the tips!Absolutely great deal, they are on sale now (think I paid $20).
Important note when installing. Make sure you first use common sense and align them first on how they should sit.
First cleaned and dried the channel. I believe they were incorrectly labeled (RH vs LH).
Tucked the lower part behind the wiper cowl and into the channel and aligned the top to curve along the top of the windshield frame.
Then slightly pulled off the tape from the top corner while applying pressure on the trim so that it remains perfectly inline with the windshield side trim..
Repeat on the other side.
Good luck!
(I believe someone in the Amazon ratings posted a photo where they were happy but I noticed that it was incorrectly installed lol)
Similar threads
🛠️ Member Build
One Piece At a Time
- Replies
- 0
- Views
- 548
G
💨 Sold / Gone
Pascagoula, MS 2024 Lexus GX550 OT+ Partial Build
- Guest787
- 🏪 Lexus GX Forum Marketplace
- Replies
- 8
- Views
- 1K
G
🛠️ Member Build
Inigo - Tig's Incognito OT Build
- Replies
- 50
- Views
- 9K
Users who are viewing this thread
Total: 3 (members: 0, guests: 3)


